Cherry Picker - Instructions for use.
Index:
Cherry Picker was working fine – now will only go around and down.
How to level.
The machine will go up and down but not round and round…
How to Slew
I can’t lower the booms to “pack up”.
How to Pack Up
An Alarm has Sounded and the machine is (or isn’t) working.
Overloading and Alarms
I can’t get controls in the basket to work.
How to get Basket/Platform Controls to work
Read and Understand safety instructions in operator’s manual BEFORE USING.
These instructions are intended as a quick reference guide and not as a replacement of the operator’s manual.
Some important Safety Points
Your safety is Important to us – and it should be to you.
* Before Setup ensure you are familiar with the controls and safety requirements of the machine.
* Avoid the following hazards; pot holes or drop offs, soft or slippery ground, overhead obstructions (Powerlines etc) and slopes or inclines that exceed the machines levelling capabilities. Machine must be set up on firm stable ground so stabilisers can’t sink or machine slip and cause machine to topple over.
* Do not operate Cherry Picker any closer than 7 metres of overhead power lines.
* Safe Working Load is 215kg max 2 people.
* Safety cut out will prevent basket from lifting if over loaded.
* Safety harnesses must be worn at all times while in the basket – harnesses are located in the pvc pipes to the left and right in the basket.
Machine Setup
Step 1
• Remove from car tow ball – Use wheel chocks to prevent rolling.The cherry picker can’t be setup while connected to your vehicle.
• PULL OUT Red Emergency Switch x 2 (Basket & Ground Panel)
Pushing these switches IN will STOP all functions.
Step 2 Levelling
The unit MUST be level, All legs on the ground and “Lift Enable” light lit for any boom controls to work.
If this step isn’t followed, you won’t be getting very high off the ground.
NOTE: only use on firm level ground.
If the legs sink into the ground, at best the machine will stop, at worst it will tip over.
a) Base Control Panel:
• Turn Key to “On/Base” (ie anti clockwise)
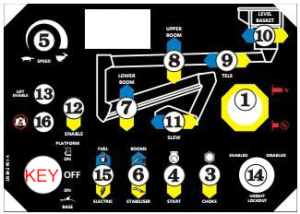
Select Electric (15 on image) – ie down
Select Stabiliser (6 on image) – ie down

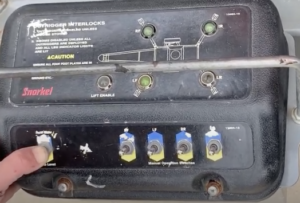
b) Stabiliser Panel:
• Hold “Auto Level” switch down until:
All four “Stabiliser” lights are on.
• Lift Enable light is on.

This takes a while – be patient.
VIDEO
Step 3. Turn Controls to the Basket/Platform
1.At Base Control.
• Turn Key to “Platform” (ie Up)
2. In Platform/Basket
• Use a harness at all times.
• Make sure Emergency Stop button is pulled out.
• Turn Speed control to “Turtle” until comfortable with speed of controls
Two Safety Controls – both must be used or nothing moves.
• The Yellow Foot Switch must be pushed down when moving a boom – no controls will work without the Yellow Foot Switch depressed. (Note – make sure nothing is stuck under the control if it doesn’t work – eg sticks or stones).
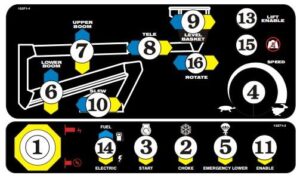
• The “Enable” lever (bottom RHS – number 11) must be pushed down.

Hmmm – Something isn’t right.
Quick Fixes to Common Problems.
Cherry Picker has moved and is out of level
If the ground is soft the cherry picker may move out of level.
NOTE: This is dangerous and should be avoided at all costs.
The unit needs to be lowered and “packed up” – all booms need to be stowed and the legs need to be raised fully.
Once stable ground has been found, the machine can be re-levelled and start using again.
“How to Level” Video
Can’t slew?
The lower boom must be 1.8mish above the ground to slew.
It’s for safety.
“How to Slew” Video
Can’t Pack Up?
If the unit “freezes” when packing up, it’s due to the lower boom not being properly aligned with the center of the machine.
Raise slightly and straighten until the “Boom Centered” light comes on – then you can lower.
“How to Pack Up” Video
An Alarm has Sounded and the unit is (or isn’t) working)
The unit has a safety cut out to prevent over-loading beyond the safe working limit of 215kg.
At 90% of the load limit, the Overload light will come on on both control panels (base and platform).
At 100% of the load limit, the light will come on and an alarm will sound (but the unit will still work).
At > 100% of the load limit the unit will stop and weight will need to be removed.
The Basket/Platform controls don’t work.
1. Make sure the Key on the Ground controls is switched to “Platform” (ie anti clockwise).
2. Two safety switches must be pushed down to make controls work – ie safety items to make sure the operator doesn’t knock a lever by mistake.
a). The yellow foot control must be pushed down (make sure nothing underneath to stop it being depressed)
b). The “Enable” lever (bottom RHS – number 11) must be pushed down.


 Download Operator Manual